Post Management
Video Tutorial
Video Transcript
Create a New Post
To add a new post to your blog, take the following steps:
- Visit your dashboard.
- Click on Posts on the left side.
- Click on the Add new post button.
- Give your post a title by typing it in the box at the top that says Add title.
- Start typing the text of your post or click on the + block inserter icon to add other content like images (learn how to use the WordPress editor here!)
You can quickly create a new post by clicking the Write button in the toolbar of your WordPress.com dashboard:
 Click Write in your WordPress Toolbar to start writing a new post
You can also publish posts by email and by voice.
Adjust the Post Settings
When working on your post, you’ll see the post settings in the sidebar on the right side of your screen
If you do not see the sidebar on the right, click the Settings icon in the top right corner to bring up the settings. This icon looks like a square with two uneven columns:

You can control the following aspects of the post here, explained in detail below:

- Under Summary, you will find the following options:
- Use Visibility to make the post public, private, or protected behind a password. Learn more.
- Set the post to Publish immediately, schedule it for the future, or backdate it in the past. Learn more.
- Select the Template that will control how the content of your post is presented. Single is the default template for posts. Learn more.
- See and change the URL of the post. Learn more.
- Stick the post to the top of the blog. Learn more.
- Mark the post as Pending review for other users of your site. Learn more.
- Change the author of the post to another user on your site.
- On already-published posts, a Switch to draft button will appear. Click this to revert the public post to a non-public draft.
- Delete the post by clicking the Move to trash button. Learn more.
- Write an excerpt to describe the post. Learn more.
- Access: Set your post to be visible to everyone, to anyone subscribed, or to paid subscribers only.
- Revisions: Using revisions, you can restore previously-saved versions of the post. This option will appear only after you have saved some changes on the post. Learn more.
- Categories: Assign categories to organize your post. Learn more.
- Tags: Add relevant tags to your post. Learn more.
- Choose a featured image to represent the post. Learn more.
- Discussion: Allow people to leave public comments on the post. Learn more.
Publish Your Post
In the top right of the screen, above the post settings, you’ll find several options for your new post:

From left to right, these options are:
- Save draft: Save the latest version of your draft post.
- If this shows Saved instead, it means the latest version of your draft has been saved successfully.
- Preview: See what your post will look like on desktop, mobile, and tablet screens. Click the Preview computer icon to see how the changes will look on the live site.
- Publish: Publish the post to your website.
- Settings Icon: Show or hide the post settings.
- Jetpack Icon: Show or hide additional options provided by the Jetpack plugin:
- AI Assistant: Check for mistakes and verify the tone of your post before publishing.
- Shortlink: Copy a shortened URL of the post.
- Social Previews: See how the post will appear on Google and social media.
- Likes and Sharing: Enable the Like button and social media sharing buttons.
- SEO: Customize the title and description of the post (eligible plans only.)
- Share this post: Share the post to your connected social media accounts.
- Help Icon: Open up the help center to search for guides or access support.
- Ellipses Menu (the three vertical dots): Open additional editor settings.
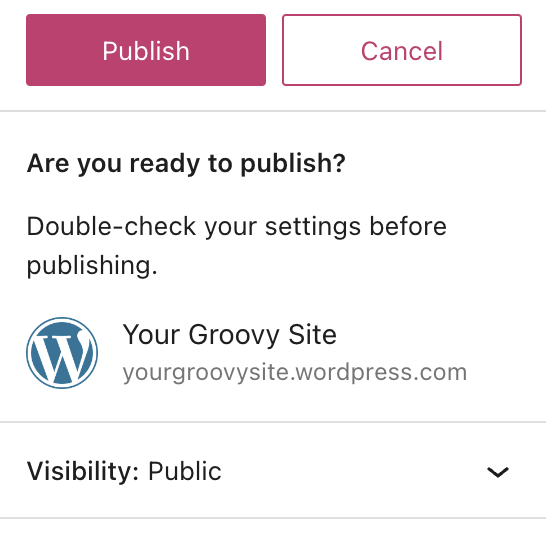
Pre-Publish Checks
Clicking that Publish button is a proud moment — you’ve finessed a piece of content and are ready to share it with the world! Before the post goes live, you will have one more chance to double-check your settings before publishing. The settings you can adjust here are:
- Visibility: Control how the post is viewed, with options for public, private, or password-protected.
- Publish the post immediately or at a date and time in the future or past.
- A suggestion to add tags to help users and search engines navigate your site and find your content.
- AI Assistant: Check for mistakes and verify the tone of your post before publishing.
- Social Previews: Preview what this will look like on social networks and Google search.
- Access: Allow the post to be viewed by everyone, existing subscribers only, or paid subscribers only.
- Newsletter: Choose if you would like to send an automated email notifying subscribers of your new post.
- Share this post: Share the post to your connected social media accounts.
- Toggle on or off the option to always show these pre-publish checks.
What Happens When You Publish
A post is different from other content types (like pages and portfolios) because several actions are triggered when you publish a new post on a public blog:
- The post appears as the newest entry on your blog page.
- The post appears in Reader feeds, unless your site is private.
- Your subscribers receive an email notification, unless you turned it off in the pre-publish checks above.
- The post is shared to your social media profiles, if you have connected them.
Edit a Post
After publishing a post, you can return to the post to continue editing it:
- Visit your dashboard.
- Click on Posts on the left side.
- Choose from one of the following tabs:
- Published: Posts you have published to your blog.
- Drafts: Posts you have started but have not yet published.
- Scheduled: Posts you have set to be published at a future date.
- Trashed: Posts that will be deleted after 30 days.
- Locate your post in the list and click the title of it to open the editing screen (learn how to use the WordPress editor here!)
Display Your Posts on a Page
There are multiple ways to display your posts on your site.
Your theme may include an Index template (for displaying all posts) and Archive template (for displaying posts by category, tag, month, and year.) Learn how to edit these templates.
Other methods you can use to display posts on a page:
- Insert a Blog Posts block onto any page.
- Insert a Query Loop block onto any page.
- Create a default post page to automatically update with your posts.
- Create a custom blog page for your posts.
- Display posts by category.
Sticky Posts
WordPress blogs display posts in reverse chronological order, with the most recent post at the top. You can mark a post as Sticky to pin it to the top, making it appear above the other posts. Sticky posts will stay at the top of your list of posts as long as they are marked as sticky.
To mark a post as sticky:
- Visit the post settings as described above.
- Under Summary, look for the checkbox Stick to the top of the blog.
- Tick the box.
- Click Update or Publish to save the change.
Only public posts can be set as sticky. Private posts are not compatible with this feature.
Sticky posts may appear highlighted in some way, depending on the theme you’re using. For example, some themes display sticky posts with a colored background behind the title.
Generally, the Sticky option is only used for one or two posts on a blog. It should not be used for every post. Be sure to uncheck the Sticky option on that post to move it back to its place in chronological order.

Join our Online Blogging Course
Gain all the fundamental (and a few advanced) skills you need to create a blog you’re proud of. Define your audience. Then build, publish, and grow your blog with an on-demand, go-at-your-own-pace course taught by the best bloggers on the internet.
Find the Post ID
You can find the post’s ID in your browser’s address bar after opening the post in the editor. For example, the post ID for the following example is “125”:
